HA Deployment
In this section we will describe a Highly Available installation of the CELAR Platform. The installation consists of a cluster of endpoint servers, a cluster of CELAR Server instances and a cluster of database servers. In this tutorial, we are describing an architecture where the database server instances are located in dedicated VMs; However, according to the scale and the usage of the CELAR Platform, the database servers could be placed into the same hosts with the CELAR Manager instances.
Before the installation and the configuration of the HA components, the following prerequisites should be satisfied:
- A hot-plugable public IP address, notated as
PUBLIC_IPand used as the endpoint of the platform, should be available. - A cluster of (at least) two VM instances used as the endpoint servers should be initialized. Each VM should contain at least 2 cores, 2GB of RAM and 10GB disk. The IP addresses of the nodes of this cluster will be referenced as
endpoint1andendpoint2from now on. - A cluster of (at least) two VM instances used as the CELAR Server instances should be initialized. Each VM should contain at least 4 cores, 4GB of RAM and 10GB disk. The IP addresses of the nodes of this cluster will be referenced as
celar-server1andcelar-server2from now on. - A cluster of (at least) two VM instances used as the Database Server instances should be initialized. Each VM should contain at least 4 cores, 4GB of RAM and 50GB disk. The IP addresses of the nodes of this cluster will be referenced as
celar-db1andcelar-db2from now on.
Each of the endpoint servers contains an HAProxy instance that redirects the traffic to the CELAR Server instances, a pgpool instance, used to redirect the traffic to the Postgresql Servers and a keepalived daemon, used to ensure that, in case of failure, another available endpoint server will be utilized.
The installation details refer to installation over CentOS systems (tested for CentOS 6.4 and CentOS 7). If you want to install the HA platform into different distributions, please refer to the web sites of each component separately, as listed below.
HAProxy
First, we need to download and install HAProxy. From the endpoint1 console, we are executing (as root):
$ yum install -y haproxy
If you want to compile from source, or install another version please visit haproxy.org.
After the installation is finished, we need to edit the configuration file of HAProxy, located at /etc/haproxy/haproxy.cfg. We open it and append the following lines:
listen celar-server 0.0.0.0:8080
  mode http
  stats enable
  stats uri /haproxy?stats
  stats realm Strictly\ Private
  stats auth username:password
  balance roundrobin
  option httpclose
  option forwardfor
  server celar-server1 celar-server1-ip:8080 check
  server celar-server2 celar-server2-ip:8080 check
You need to replace the username and password strings above with your own choices (used to have access to the stats screen of HAProxy). If the CELAR Manager is configured to point to a different point than the default 8080, then you need to alter the conf file accordingly. Finally, make sure that the celar-server1 and celar-server2 entries on the /etc/hosts file, point to celar-server1 and celar-server2 respectively.
We then need to restart the HAProxy instance,
$ service haproxy restart
And then check the stats screen of the by pointing to http://endpoint1:5000/haproxy?stats.
Finally, we repeat the same procedure for endpoint2 and the rest of the machines of the endpoint cluster (if more than two).
keepalived
To avoid the single point of failure caused by the endpoint instance, we are using keepalived. Keepalived is executed in all endpoint instances; one is picked as the master instance and the rest are the slaves instances. The master instance is assigned with the PUBLIC_IP and is responsible to redirect the traffic to the CELAR Server instances. In case that the master instance fails, keepalived daemons are notified and elect an existing node that is promoted to the new master instance. It is very important that all endpoint instances (master and slaves) retain an identical environment, so that a smooth transition is guaranteed.
To install the keepalived daemon, we use the console of endpoint1 and execute (as root):
$ yum install -y keepalived
In case you want to use another installation method, please vitit keepalived.org. You need to repeat this procedure for every endpoint instance. In our example, we assume that endpoint1 is the master instance and endpoint2 is the slave instance. Furthermore, eth0 is the (possibly private) interface that connects endpoint1 and endpoint2 into the same network, used by keepalived for monitoring purposes. eth1 is the interface that is used by the public IP address PUBLIC_IP.
We update the file /etc/keepalived/keepalived.conf of endpoint1 and append the following lines:
vrrp_instance VI_1 {
  debug 2
  interface eth0                # interface to monitor
  state MASTER
  virtual_router_id 51          # Assign one ID for this route
  priority 101                  # 101 on master, 100 on backup
  unicast_src_ip endpoint1      # My IP
  unicast_peer {
     endpoint2                  # peer IP
  }
  notify /usr/local/bin/keepalivednotify.sh
}
In case that more endpoint instances exist, we should append them into the unicast_peer section. Furthermore, we create the file /usr/local/bin/keepalivednotify.sh with this content:
#!/bin/bash

PUBLIC_INTEFACE="eth1"
UDEV="/etc/udev/rules.d/70-persistent-net.rules"
PUBLIC_IP=           # the PUBLIC_IP address
SERVER_ID=           # the SERVER_ID of the current host as defined by the cloud provider


TYPE=$1
NAME=$2
STATE=$3

LOG_FILE="/var/log/keepalived_script.log"
echo -e "$(date):\t$STATE, $NAME, $TYPE" >> $LOG_FILE
case $STATE in
       "MASTER")
               # clear udev prior to attaching
               sed -i "/$PUBLIC_INTEFACE/d" $UDEV
               # detach IP
               /usr/bin/kamaki ip detach $PUBLIC_IP
               # attach IP
               /usr/bin/kamaki ip attach $PUBLIC_IP --server-id $SERVER_ID
               # DHCP call
               dhclient -r $PUBLIC_INTEFACE
               dhclient -v $PUBLIC_INTEFACE
               exit 0
               ;;
       "BACKUP")
               exit 0
               ;;
       "FAULT")
               exit 0
               ;;
       *)      echo "unknown state"
               exit 1
               ;;
esac
Keepalived calls this script (also called a notify script) every time a transition is happening. The former slave node is notified that it becomes a master, and uses kamaki, an ~okeanos client, to detach the IP from the former master node and attach it to the current node. When the script execution is finished, it is guaranteed that the new master node has received the appropriate IP address.
The same configuration files must be updated into endpoint2 as well. Specifically, we edit /etc/keepalived/keepalived.conf and append the following lines:
vrrp_instance VI_1 {
  debug 2
  interface eth0                # interface to monitor
  state BACKUP
  virtual_router_id 51          # Assign one ID for this route
  priority 100                  # 101 on master, 100 on backup
  unicast_src_ip endpoint       # My IP
  unicast_peer {
      endpoint1                 # Peer IP
  }
  notify /usr/local/bin/keepalivednotify.sh
}
where we notice that the priority is lower than the priority of the MASTER node. We again create the file /usr/local/bin/keepalivednotify.sh as above, with the difference that SERVER_ID must now point to the server id of the endpoint2 instance. Finally, we restart keepalived daemons to all the cluster by issuing
$ service keepalived restart
and the environment is now ready for use.
Note: the file /usr/local/bin/keepalivednotify.sh contains all the necessary actions that must be executed to transfer the public IP address from the old master to the new master. The demo scripts presented here, assume that the cloud provider that the platform is built on is ~okeanos. However, by updating the scripts accordingly, one can easily port the setup to any cloud provider.
PGPool
In order to build a highly available deployment of CELAR DataBase, we will leverage the mechanisms available from the DataBase backend system. The CELAR DataBase uses PostgreSQL RDBMS, which offers what is called “Streaming Replication with Hot Standby”. This technique was introduced in newer versions of PostgreSQL and builds upon a known and pre-existing mechanism: the Write-Ahead Logging mechanism. The log is streamed in real-time to one or more replica servers. The next 3 sections explain how to set up this functionality by using PGPool as a proxy for the DB cluster.
- The configuration steps are split for the 3 components of the HA cluster:
- The Master replica node
- The Standby replica node
- The pooling/High Availability proxy (PGPool) node
Note: In order to leverage this HA mechanism, the DB clients need to be reconfigured in order to connect to the PGPool host and port (here 9999). The following figure shows how the resulting cluster operates.
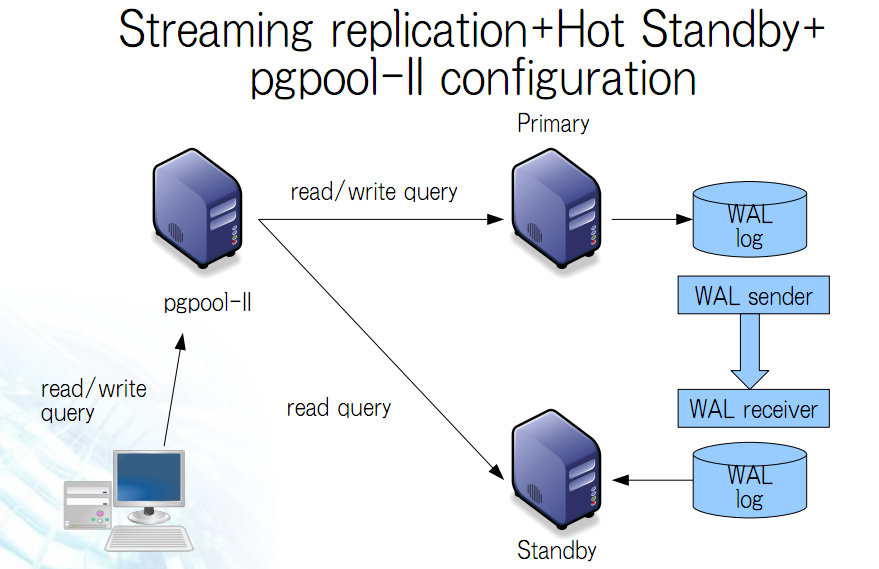
The following sections assume a cluster of 1 master replica (
celardb-master) and 1 replica node (celardb-replica-1).
Master Configuration
In order to configure a master-slave set-up for the master node, we need to apply some changes in the PostgreSQL configuration files.
Note: As a master replica one can use a pre-existing CELAR DataBase node, since this configuration does not affect the pre-existing data. However the process will restart the DB service and thus interrupt all active connections to it. Therefore it is suggested that the following steps for the Master as well as the Standby nodes will be run on an idle setting.
- Changes in
/var/lib/pgsql/data/postgresql.conf: listen_addresses = '*' wal_level = hot_standby hot_standby = on synchronous_commit = local max_wal_senders = 3 wal_keep_segments = 8 synchronous_standby_names = '*'
- Changes in
/var/lib/pgsql/data/pg_hba.conf: local all all trust host all all 127.0.0.1/32 trust host all all ::1/128 trust host replication replicator 0.0.0.0/0 md5 host all all 0.0.0.0/0 md5
Restart the PostgreSQL service to load changes
$service postgresql restart
Create replicator user with REPLICATION permissions (run as user “postgres”)
$psql -U postgres -c "CREATE USER replicator REPLICATION LOGIN ENCRYPTED PASSWORD 'celar-db';"
Flush iptables
$iptables -F #flush iptables
Create testuser (as user “postgres”)
$psql -U postgres -c "CREATE USER testuser createdb PASSWORD 'test';"
Create the “testuser” database (as user “testuser”)
$psql postgres testuser -c "CREATE database testuser;"
Standby Configuration
Since we are configuring the replica server, we are assuming that we are starting with an empty PosgtreSQL data directory (
/var/lib/pgsql/data) ie. a barebones installation.The first thing we are doing is using the automated backup tool to create a backup of the primary replica in the local data directory. The following command does so, using for the primary the hostname
celardb-masterand the replication passwordcelar-db. The following is performed as userreplicatorin a streaming manner. Therefore, when the command finishes it is guaranteed to be up-to- date with changes happening during its execution, but it will never finish if the master replica is under continuous load. Therefore this step should preferably be performed in an idle setting.
Take the backup with this command:
PGPASSWORD=celar-db pg_basebackup -h celardb-master -D /var/lib/pgsql/data -U replicator -v -P -X streamThis actually creates copies of the configuration files from the master replica. Minimal changes are needed for configuring the standby replicas.
In the file
/var/lib/pgsql/data/postgresql.conf set :
- ::
- hot_standby = on
- Create the recovery configuration file file be executing the following:
# set recovery settings
cat > /var/lib/pgsql/data/recovery.conf <<- EOF
standby_mode = 'on'
primary_conninfo = 'host=celardb-master port=5432 user=replicator password=celar-db '
trigger_file = '/tmp/promotedb.trigger'
The postgresql service can now be started:
service postgresql start
As a precaution flush iptables:
iptables -F
PGPool Configuration
Download the latest version PGPool from here. Extract and install it via the following command: $
./configure && make && make installWe will need to edit the PGPool configuration file in order to reflect the master-slave streaming replication configuration that we have set-up on our PostgreSQL cluster.
- Add the following entries for the PGPool config file in
/usr/local/etc/pgpool.conf listen_addresses = '*' port = 9999 # - Backend Connection Settings - backend_hostname0 = 'celardb-master' backend_port0 = 5432 backend_weight0 = 1 backend_data_directory0 = '/var/lib/pgsql/data' backend_flag0 = 'ALLOW_TO_FAILOVER' backend_hostname1 = 'celardb-replica-1' backend_port1 = 5432 backend_weight1 = 1 backend_data_directory1 = '/var/lib/pgsql/data' backend_flag1 = 'ALLOW_TO_FAILOVER' pool_passwd = 'pool_passwd' # File name of pool_passwd for md5 authentication. "" disables pool_passwd. connection_cache = on replication_mode = off replicate_select = off load_balance_mode = on # Master-Slave mode master_slave_mode = on master_slave_sub_mode = 'stream' # Streaming replication check user/password sr_check_user = 'testuser' sr_check_password = 'test' # Health check user password health_check_user = 'testuser' health_check_password = 'test' # failover called with %d: node id, %M old master node ID, %m new master node ID failover_command = '/usr/local/etc/my_failover.sh %d %M %m \n $(date) fail_over_on_backend_error = on recovery_user = 'nobody'
(Note: Those entries are for hostnames
celardb-masterandcelardb-replica-1)
We can now start the PGPool proxy service.
The following command starts pgpool and logs its output in a rotate-log.
pgpool -n 2>&1 | /usr/local/apache2/bin/rotatelogs -l -f /var/log/pgpool/pgpool.log.%A 86400 &